Summer Nicoise Salad, My Version

Oh, sorry blog. I neglected you for the first half of 2013. Hi, readers! Do you remember me? If you know me well, and you haven’t  just stumbled across Oishii from a google search for “pork loin chops” (our most popular post), then you already know the two reasons behind this embarrassingly long hiatus. If not, welcome, and let me share our joy with you!

1. We’re expecting again! Levi is going to be a big brother in August and the gender is once again going to be a surprise. At almost 29 weeks I’m definitely far enough along that I can’t use morning sickness as an excuse for my lack of blogging, but taking care of a 3 year old definitely keeps me busy. In fact, sometimes I completely forget that I’m pregnant, until I look down and notice the absence of toes, or realize I’m craving a crisp, floral IPA but then remember that I can’t indulge just yet and reach for a sparkling water instead. Speaking of beer …

27 weeks on mothers day

2. Our family business, Discretion Brewing, opened its doors in early March after a year + of planning, and we’ve been as busy as bees selling beer (we have 7 now on tap!) and small plates to pair with it. Despite my growing belly and inability to drink beer, I’m enjoying working behind the bar as a Beer Bestower, as well acting as our Queen of Social Media for the business. Things are going really well, and we’ve been well-received by our town, even by other micro-breweries. The beer community is an awesome one. If you’re ever in Santa Cruz, we’d love to have you!

twitter header
Now you can see why our dinners at home have been quick and easy these days — and also based around random pregnancy cravings, ranging from briny olives [this salad] to cinnamon rolls [breakfast for dinner]. I’ve also been terrible at photographing or writing anything down (and, as you know if you’ve been pregnant, when you’re hungry, you’re hungry. No time for pictures). But somehow this meal DID get photographed. I guess I made it early enough in the day that I had a few moments to spare, so I’ll share it with you. Summer is upon is (eek – better get that car seat purchased and decide on a name for this baby!) and this salad is perfect for a warm evening . It also boasts of seasonal farmer’s market faire.

Summer Nicoise Salad, My Version
nicoise salad
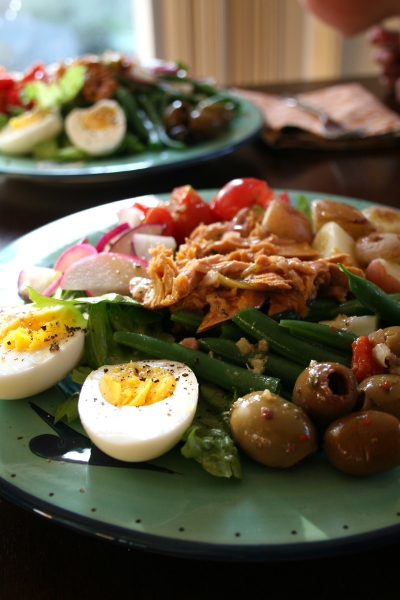
Nicoise Salad; the classic French salad is usually composed of tuna, green beans, hard-boiled eggs, tomatoes, and an anchovy dressing. This is my version.

Start with crisp romaine lettuce, wash, spin dry, tear into bite sized pieces, and pile onto your serving plates. Arrange the various components on top of the lettuce in whatever order pleases you: Quickly blanched farmer’s market green beans  (just 2-3 min in boiling water until bright green and still crisp, then plunge them into an ice bath to stop cooking), halved boiled new potatoes, halved cherry tomatoes, sliced farm-fresh radishes, hard-boiled eggs, halved, sprinkled with a little salt & pepper, some pitted, marinated green & brown olives, and some jarred tuna fillets in olive oil (check out Tonnino brand – we love the jalapeno flavor, one of my favorite pantry staples, and perfect for picnics if you don’t use them in this salad).

Anchovies don’t really agree with me this pregnancy, so I’ll recommend this shallot-dijon vinaigrette instead: Whisk together dijon mustard, sherry vinegar, a little red wine vinegar, minced shallot, a little agave nectar for sweetness, salt and pepper. Add olive oil in a steady stream and continue to whisk until incorporated. Taste and adjust ingredients as necessary. Drizzle the dressing over the top of the salad and all its colorful components. Let your plate be your blank canvas and feel free to tweak things depending on what fresh produce you have available. I hope that I inspired you 🙂 Happy Memorial Day Weekend, everyone!

Columbia 1905 Salad


All that research about Cuban recipes for Krystal’s virtual baby shower paid off – I now have several mouth-watering recipes bookmarked from Saveur, one of my favorite food magazines/websites. Among magazines that focus on celebrity chefs and the newest burger trends, Saveur stands apart with its honest, down-to-earth, genuine celebration of different cultures, food, and the people who make it.

As I scrolled through my search results for “Cuban food,” I came across this salad called the “Columbia 1905,” which is from the blog Sticky Gooey Creamy Chewy. The salad originates from a Cuban restaurant in Florida named the Columbia and consists of crispy iceberg lettuce, julienned ham, Swiss cheese, pimento-stuffed green olives, grated Romano cheese, and a garlicky, lemony dressing. At the Columbia restaurant, tuxedo clad waiters toss the salad at your table, which I imagine adds a nice dramatic touch before digging into your first course.

We omitted the tomatoes because they’re not yet in season (though I long for them), added some diced green bell pepper because it sounded appealing, and the best thing (wait for it) – added some crumbed chorizo bacon from El Salchichero, sort of a play on a Cuban-style club sandwich, er, salad. And while it’s not the lowest sodium dish in the world, this flavorful salad with Cuban flair is substantial enough to be a dinner on its own, and special enough to be served for dinner guests. You might want to keep this recipe in mind in a couple weeks when you’re looking for new ways to use up leftover Easter ham!

And you know those Garlic Knots I just posted? They would be an awesome accompaniment to this salad!


Columbia 1905 Salad

(Just slightly adapted from Sticky Gooey Creamy Chewy, as seen on Saveur.com)

For the Salad:

4 cups iceberg lettuce, chopped
1/2 a large green bell pepper, diced
1/2 cup ham, julienned
1/2 cup Swiss cheese, julienned
1/2 cup pimiento-stuffed green Spanish olives, sliced
2 cups “1905” Dressing (see recipe below)
1/2 cup Romano cheese, grated
1 tsp. – 1 TBS. Worcestershire sauce, according to your taste (we used 1 TBS.)
1-2 TBS. fresh lemon juice, according to your taste (we used 1/2 a lemon)
2 strips of chorizo bacon (or regular bacon if you don’t live near El Salchichero), cooked and crumbled

For the “1905” Dressing:

1/2 cup extra-virgin olive oil
4 garlic cloves, minced
2 tsp. dried oregano
2 TBS. cup white wine vinegar
Salt and pepper to taste

  • To make the dressing, combine the olive oil, garlic, and oregano in a small bowl and mix with a whisk. Gradually add the vinegar, beating to form an emulsion. Season with salt and pepper to taste. (For best results, prepare 1 to 2 days in advance and refrigerate).
  • Combine lettuce, peppers, ham, Swiss cheese, and olives in a large salad bowl. Before serving, add “1905” Dressing, Romano cheese, Worcestershire, and the fresh lemon juice. Toss well, top with crumbled chorizo bacon, and serve immediately. Serves 2 as a main course or 4 as a side salad.

Endive and Apple Salad with Warm Goat Cheese and Pomegranate Vinaigrette


Salad for dinner may conjure up images of summer evenings, but this one is about as wintry as you can get, and (dare I say) just as comforting as a bowl of soup. Endive cooked in butter becomes nutty and caramelized, pairing perfectly with sautéed apples, baked walnut-encrusted goat cheese, fresh baby spinach leaves, and a sweet-slightly tart pomegranate vinaigrette. We loved the juxtaposition of warm goat cheese, apples, and endive with the cool spinach and the pop of fresh pomegranate seeds. It’s everything you want in a dinner salad, with winter flair. Since we are traveling the day after Christmas to spend time with family, and probably won’t get a chance to post until the new year, we’ll leave you with this festive salad as a way to say Merry Christmas and Happy 2012!! We look forward to the coming year, when we will celebrate our blog’s 5th anniversary (crazy)! There is also a little family venture that’s been brewing that we will reveal soon . Thanks, readers (whoever you are; I love finding out who is actually following along!) What’s your wish for the new year? See you then!


Endive and Apple Salad with Warm Goat Cheese and Pomegranate Vinaigrette

(From the Oct/Nov 2011 issue of Fine Cooking; Serves 4)

1 cup pomegranate juice
6 oz. goat cheese
1/2 cup finely chopped hazelnuts*
3 TBS. butter
2 large Belgian endives, halved lengthwise with core left intact, each half cut lengthwise into 4 pieces
Kosher salt and freshly ground black pepper
2 firm, medium-sweet apples (like Fuji or Honeycrisp), peeled, cored, and cut into 1/2-inch dice (about 3 cups)
1 medium shallot, finely diced (about 3 TBS.)
1 TBS. cider vinegar
1 tsp. Dijon mustard
6 TBS. extra-virgin olive oil
4 oz. (4 lightly packed cups) baby spinach
1/3 cup fresh pomegranate seeds (optional)**
2 Tbs. thinly sliced fresh chives***

* We used walnuts instead.
** Optional, yes, but they look so pretty, don’t they? And they add a refreshing pop to the salad.
*** Our store was out of chives, so I omitted these.

  • Position a rack in the center of an oven and heat to 425°F.
  • In a small saucepan over high heat, reduce the pomegranate juice to about 1/4 cup (it should be syrupy), about 15 minutes (mine took about 12).
  • Meanwhile, mash the goat cheese in a small bowl with a fork until smooth (I must have used a dryer goat cheese because it didn’t mash well. I skipped this step and went straight to forming it into rounds). Form the cheese into four 2-inch-diameter rounds. Put the hazelnuts (or walnuts) on a small plate and press the goat cheese rounds into the nuts on all sides to coat. Transfer the cheese to a small baking sheet and bake until the nuts brown and the cheese softens, 8 to 10 minutes.
  • While the goat cheese bakes, melt 2 TBS. of the butter in a 12-inch heavy-duty skillet over medium-high heat. Arrange the endives flat in the pan (they’ll fit snugly), sprinkle with 1/2 tsp. each salt and pepper, and cook, undisturbed, until browned, 2 to 3 minutes. Flip and cook until the other side starts to soften, 1 to 2 minutes. Transfer to a large plate.
  • Melt the remaining 1 TBS. butter in the skillet, add the apples and shallot, sprinkle with 1/4 tsp. salt and cook, shaking the pan often, until the apples start to soften, 2 to 3 minutes.
  • Transfer the pomegranate juice to a medium bowl. Add the vinegar, mustard, and 1/2 tsp. each salt and pepper; whisk until combined. Gradually whisk in the oil and season with more salt and pepper to taste.
  • In a large bowl, toss the spinach and apples with half of the vinaigrette and season to taste with salt and pepper. Arrange the endives on 4 large serving plates, top  with a mound of the spinach mixture, and then the goat cheese. Sprinkle with the pomegranate seeds and drizzle with the remaining vinaigrette. Serve.

Grilled Butter Lettuce with Buttermilk-Chive Dressing


It’s easy to get into a salad rut, so I wanted to share a quick recipe that we discovered this past weekend. If you’re already grilling for dinner, why not throw the salad on too? Just halve a head of butter lettuce and grill cut-side down for a few minutes until it’s nicely charred and wilted, while the inner core retains that distinct butter lettuce crunch. Transfer to a serving plate and drizzle a creamy and tangy buttermilk-chive dressing over it. The dressing takes less than 5 minutes to whisk together, and paired with the grilled lettuce and its pleasing caramelized edges, you won’t know what’s hit you. Your ho hum dinner salad has been transformed! Enjoy & Happy 4th of July to all our readers!


Grilled Butter Lettuce with Buttermilk-Chive Dressing

(From the June/July 2010 issue of Fine Cooking)
Serves 8

1/2 cup buttermilk
1/4 cup crème fraîche*
2 Tbs. mayonnaise
2 Tbs. thinly sliced fresh chives
1 Tbs. fresh lemon juice
Kosher salt
Vegetable oil for the grill
4 large heads butter lettuce, halved lengthwise

* Try adding some leftover crème fraîche and chopped chives to your scrambled eggs in the morning. Delicious.

  • In a medium bowl, whisk together the buttermilk, crème fraîche, mayonnaise, chives, and lemon juice. Season to taste with salt. (Can be made 1 day ahead, covered, and refrigerated).
  • Prepare a charcoal or gas grill for direct, medium-high heat.
  • Lightly season the halved heads of lettuce with 1/4 tsp. salt. Grill cut side down until wilted, lightly charred, and the cores are crisp-tender, 2 to 3 minutes.
  • Transfer grilled lettuce to a serving platter (or individual plates) and drizzle with dressing (you won’t need all of it). Lightly season with salt and serve.

Southwestern Grilled Chicken Salad with Cherry Tomato-Black Bean-Corn Salsa


As I’m writing this it’s drizzling, and since we can’t play outside, Levi is entertaining himself with a drawer filled with various kid-friendly kitchen implements (the “decoy drawer,” as I call it, because it keeps him away from the dangerous stuff and buys me a few minutes here and there to write blog posts, fold laundry, or answer the phone). I swear that just yesterday we were enjoying the warmth of the early evening sun, grilling chicken in the backyard, and sipping icy pints of IPA. Levi was playing in his shark sprinkler — the perfect summer scene. How the weather changes on the central coast! And how we as mothers adapt as far as activities go for our kids.


Speaking of adaptation, meals take even more planning-ahead these days. Not only is Levi walking; he’s running and climbing — onto couches, chairs, boxes, whatever he can. You have no idea how many distractions I had to have in place in order to make this cherry tomato-black bean-corn salsa. It’s hard when every 20 seconds you have to look up from whatever you’re doing to make sure your son hasn’t scaled the bookshelf. But somehow I made it work and we ended up with this beautiful salad for dinner, which was perfect for a warm evening, but also sounds delicious now as I hear the pitter-patter of rain against the window.

The chicken is seasoned with a delicious spice mixture of chile powder, brown sugar, cumin, and coriander before being grilled to perfection. Then it’s sliced and set on top of crunchy romaine lettuce, along with a spoonful of the salsa, and sliced avocado, and dressed with  a slightly sweet/slightly tart lime-cilantro vinaigrette. My slight adaptation to this Fine Cooking recipe is that we decided to grill some corn on the cob and add the kernels to the salsa, which added a nice sweet flavor and seemed to fit in with the southwestern theme. We also used romaine instead of Bibb lettuce, omitted the pine nuts (because we didn’t have any) and substituted chicken thighs for the chicken breasts. Our changes are reflected below. We hope you enjoy this dinner salad this summer. Its bold flavors will not disappoint.


Southwestern Grilled Chicken Salad with Cherry Tomato-Black Bean-Corn Salsa

(Slightly adapted from the Aug/Sept 2010 issue of Fine Cooking)

4 boneless, skinless chicken thighs
1/2 TBS. chili powder
1 tsp. brown sugar
1/2 tsp. ground coriander
1/2 tsp. ground cumin
Kosher salt
1 large ear of corn, husked and lightly oiled
6 TBS. extra-virgin olive oil
2 TBS. +  2 tsp. fresh lime juice
1 TBS. + 2 tsp. chopped fresh cilantro, plus leaves for garnish
2 tsp. honey
Freshly ground black pepper
Tabasco (optional)
1/2 of a 14-oz. can black beans, rinsed and drained (save other 1/2 for another use)
4 oz. small cherry or grape tomatoes, quartered or halved (about 3/4 cup)
1 small clove garlic, minced
1  head romaine lettuce, chopped
1 medium firm-ripe avocado

  • Prepare a medium-high gas or charcoal grill fire.
  • In a small bowl, combine the chili powder, brown sugar, coriander, cumin, and 3/4 tsp. salt. Rub the spice mixture over both sides of the chicken thighs (you’ll have some left over, but it’s a great spice blend for another use). Let chicken sit at room temp while the grill heats.
  • Grill the corn until tender and the kernels are charred in spots, about 6 minutes. Set aside and allow to cool. Grill the chicken thighs until done, about 6 minutes, flipping once. Let rest for 5-10 minutes.
  • Using a knife, carefully cut the kernels off the cob (this is easier when done in a large bowl so the kernels don’t go flying everywhere) and transfer to a small bowl.
  • In a small jar or other container with a tight-fitting lid, combine the olive oil, lime juice, 1 TBS. of the chopped cilantro, the honey, 1/2 tsp. salt, a few grinds of pepper, and a few shakes of Tabasco (if using). Shake well to combine.
  • To make the salsa, add the beans, tomatoes, garlic, remaining 2 tsp. cilantro, and a pinch of salt to the small bowl with the grilled corn kernels. Add 2 TBS. of the dressing and toss gently.
  • Put the lettuce in a bowl, season with a little salt, and toss with just enough of the dressing to lightly coat. (Reserve a little to drizzle on the chicken.) Arrange the lettuce on a platter or two dinner plates. Slice the chicken thighs. Pit and slice the avocado. Arrange the chicken slices, avocado, and salsa on the lettuce. Drizzle a little of the remaining dressing over the top. Garnish with cilantro leaves.

Oven-Fried Onion Rings


If you know me well, you know that I can’t turn down an order of onion rings. If there is an option to substitute onion rings for fries on a menu, I’m there. So imagine how pleased I was when I came across this recipe for a baked version of my favorite fried-food guilty pleasure. What made me want to try these was the breading. I was really intrigued by the combination of kettle chips and saltine crackers. The kettle chips give the onion rings that distinct deep-fried taste, and the saltines absorb some of the oil so that you get a nice crispy coating with just the right amount of salt. I was in heaven. In fact, I didn’t even feel the need to dip these rings into ketchup because they tasted so good on their own.


Oven-Fried Onion Rings

(From Pink Parsley; Originally from Cook’s Illustrated, Summer Entertaining 2010)

1/2 cup all-purpose flour
1 large egg
1/2 cup buttermilk
1/4 tsp. cayenne pepper
1/4 tsp. paprika
salt and black pepper
30 saltine crackers
4 cups kettle-cooked potato chips
2 large yellow onions
6 TBS. vegetable oil

  • Adjust your oven racks to the lower-middle and upper-middle positions, and preheat oven to 450 degrees.
  • Get out 3 shallow baking dishes. In the first one, spread 1/4 cup of the flour. In the second, whisk together the egg, buttermilk, remaining 1/4 cup flour, cayenne, paprika, 1/2 tsp. salt, and 1/4 tsp. pepper.
  • Pulse the chips and the saltines in a food processor until finely ground. Spread the crumbs in the third baking dish.
  • Slice the onions into 1/2-inch thick rounds.  Separate the rings. Set aside any rings smaller than 2 inches in diameter for another use.
  • Pour 3 TBS. of oil onto each of 2 rimmed baking sheets (I lined them with foil first, for easier clean-up later).  Place the sheets in the oven and heat until just smoking, about 8 minutes.
  • Meanwhile, prep the onion rings. Working with 1 at a time, dredge in the flour, shaking off excess. Dip the rings in the buttermilk mixture, allowing excess to drip back into the dish (I took Josie of Pink Parsley’s advice and used a fork for this step). Drop the rings in the crumb mixture and turn them to coat evenly. Transfer rings to a large platter or baking sheet.
  • Carefully remove the baking sheets from the oven and tilt them to coat evenly with oil. Arrange the onions in a single layer on the baking sheets.  Bake, flipping the onion rings and switching and rotating the position of the baking sheets halfway through baking, until golden-brown on both sides, about 15 minutes.  Briefly drain the onion rings on paper towels before serving.

My love for onion rings has been exemplified in the fact that I’ve been focusing on them instead of the other things that were on the dinner table that evening. But that doesn’t mean that they were not worthy of mention. Quite the opposite! El Salchichero recently made these English pea sausages that we just had to try. They were delicious. We loved that the peas were left whole throughout the sausage. The addition of mint added a nice, bright flavor.


I also made an Asian-inspired slaw starring mei qing choi instead of the usual cabbage. Normally, we just halve mei qing choy and grill it (as we do with bok choy), but I wanted to do something a little different this time. I chopped it raw, added shavings of purple carrot, as well as slices of radish, chopped green garlic, and a little chopped fresh basil. I dressed it with rice vinegar, a tiny bit of sesame oil, a splash of soy sauce, and salt & pepper to taste.


It was nice having a colorful, flavorful, veggie-packed slaw to eat alongside the onion rings and grilled sausages. Even though the onion rings were baked, the slaw took away any remaining guilt 🙂

Miso-Sriracha Glazed Salmon with Spicy Slaw


After two flavorful dinners from The Sriracha Cookbook — Ultimate Sriracha Burgers and Camarones a la Diabla — it was time for Sriracha dinner night #3. In this recipe, Sriracha plays a more subtle role, adding just a hint of spiciness to a sweet glaze balanced by the savory flavors of miso and soy sauce. Broiling caramelizes the glaze nicely, while cooking the salmon to a perfect medium/medium-rare. Most of the spice in this meal comes from the slaw. The addition of mint, peanut butter, and fish sauce is reminiscent of Thai flavors. It’s the perfect companion to the salmon, or try it as a zesty alternative to coleslaw at your next BBQ. We also made a quick side dish of sautéed sugar snap peas with fresh chopped mint to tie all the flavors together.


Miso-Sriracha Glazed Salmon

(From The Sriracha Cookbook; Serves 6)

3 TBS. toasted sesame oil
1/2 cup firmly packed light brown sugar
1/4 cup soy sauce
1/4 cup white miso paste
3 TBS. Sriracha
1 clove garlic, minced
nonstick cooking spray (or canola oil for greasing)
6 (6-oz.) salmon fillets, about 1-inch thick (alternatively, you can buy one large salmon fillet and divide it into portions after cooking)
6 sliced green onions, green part only, for garnish (reserve the white parts for the slaw!)

  • Preheat the broiler.
  • In a small nonreactive bowl, combine the sesame oil, brown sugar, soy sauce, miso, Sriracha, and garlic.
  • Line a rimmed baking pan with foil (this will make clean-up much easier later on!) and spray with cooking spray (or lightly grease with oil). Place the salmon on the foil and brush some of the glaze over the salmon, enough to evenly cover the surface.
  • Broil 6 inches from the flame, basting the salmon twice with more glaze (we had some leftover so don’t feel like you need to use all of it). Broil until the salmon flakes easily at the center of the fillet, 9-10 minutes. Don’t be alarmed if you see some smoke. That’s what the soy sauce does when it’s caramelizing.
  • Remove salmon from baking pan and transfer fillets to plates. Garnish with green onion and serve.


Spicy Slaw

(From The Sriracha Cookbook; Serves 6-8)

For the Dressing:

1/3 cup chunky natural peanut butter
1/4 cup freshly squeezed lime juice
1/4 cup fresh pineapple juice
1/4 cup Sriracha
2 cloves garlic, minced
2 TBS. fish sauce
1 TBS. grated ginger
2 TBS. sugar

For the Slaw:

1 1/2 lbs. napa cabbage, shredded
1/2 lb. red cabbage, shredded (we used green, so our slaw wasn’t quite as colorful)
2 carrots, peeled and julienned (we grated them)
2 red bell peppers, seeded and julienned
1 jalapeño, seeded and minced (depending on your heat tolerance, you may want to omit this. It’s already pretty spicy with the Sriracha)
6 green onions, white part only, thinly sliced on the diagonal
1/4 cup chopped fresh cilantro
1/4 cup chopped fresh mint
salt & freshly ground black pepper

  • First, make the dressing. In a medium bowl, combine the peanut butter, lime juice, pineapple juice, Sriracha, garlic, fish sauce, ginger, and sugar. Cover and refrigerate until ready to use.
  • Next, make the slaw. In a large bowl, mix together the napa and red (or green) cabbages, carrots, bell peppers, jalapeño, green onions, cilantro, and mint.
  • Add the dressing and toss to mix. Season with salt & pepper to taste.

Tori no Karaage (Japanese Fried Chicken) with Wasabi-Potato Salad


My Japanese cookbook translates this recipe as “Fried Chicken Chunks,” but I don’t think that name does it justice. We nostalgically refer to Tori no Karaage (which means “fried chicken”) as “Japanese festival chicken” because whether the occasion was cherry blossom-viewing in the spring or a hanabi (fireworks) show in the summer, we could always count on there being a fried chicken stand (which was more appealing to us than the whole-squid-on-a-stick stand). As you walk through a Japanese festival, the air smells like a sweet and savory combination of fried food, seafood, and caramelized soy sauce (the latter comes from the squid-on-a-stick; It’s doused in a sweet soy sauce before being grilled over an open flame). If you don’t read Japanese, don’t worry; all of the food stands have a banner displaying a cute little cartoon of the animal they’re cooking, such as a chicken, octopus or squid.

What makes Japanese fried chicken unique is that it’s marinaded in soy sauce and sake first, and then coated in potato (or corn) starch before being deep-fried, producing a very flavorful, moist inside and a distinct, crispy coating. It’s great eaten hot out of the oil for dinner with mayonnaise and spicy Japanese mustard for dipping, or eaten cold in a bento box for lunch. It’s also a popular beer snack. You’ll find this dish on the menu at izakaya, Japanese bars that also serve snacks.


We decided to make wasabi potato salad to go with our Japanese fried chicken. Just as American fried chicken and potato salad often go together at 4th of July BBQs, you’ll find potato salad (along with macaroni salad) in the prepared foods section of Japanese grocery stores, conveniently located right next to all of the fried food offerings.


Japanese Mayonnaise – “Kyu-pi Ma-yo-ne-zu

A couple weeks ago, a friend (and English student) of ours from Japan sent us a package with lots of Japanese goodies, including the makings for Japanese potato salad: Japanese mayonnaise (which is slightly sweeter than the American variety and packaged in a squeeze bottle made of soft plastic), wasabi, and a bottle of Japanese pepper (Sanshou, which comes from the Sanshou plant and can be eaten in leaf or powder form). You mix those three ingredients into finely chopped boiled potatoes and you have authentic Japanese potato salad! I also added some sliced cucumber, because the supermarket that was across the street from our apartment prepared it that way and I have fond memories of eating it for lunch.

(If you want to read more about Japan’s love for fried foods, you might enjoy this old post, which I’ll resurrect for you. I talked about kushi-katsu restaurants that serve various fried foods on sticks that you dip into a communal sauce at your table. Sound fun?)


Tori no Karaage (Japanese Fried Chicken)

(Adapted from this little Japanese cookbook that one of my English students gave me called Japanese Favorites by Angela Nahas. It didn’t exist on Amazon, otherwise I’d link to it :))

16 oz. chicken tenders (or boneless-skinless chicken breasts), cut into bite-sized pieces
3 tsp. soy sauce
3 tsp. sake*
1 tsp. sesame oil
4 TBS. potato or corn starch
Canola oil for deep-frying

* We didn’t have time to run to the store, so I just used mirin, a Japanese rice cooking wine

  • In a medium bowl, combine the chicken, soy sauce, sake and sesame oil. Cover and let marinate for at least 30 min. or overnight. Meanwhile, place the potato (or corn) starch in a large ziplock bag.
  • Drain the chicken and place it in the bag with the starch. Close bag securely and shake until the chicken pieces are well coated. Add a little more starch if needed.
  • Heat the oil in a wok (or medium saucepan) until bubbles start to form around the handle of a wooden spoon when it’s lowered into the oil (this is a cool little trick I learned from the book!) Fry the chicken in batches, about 3-4 min. for each batch, or until chicken is golden brown, turning once.
  • Drain on paper towels and serve with wasabi potato salad. Serves 3-4.


Wasabi Potato Salad

yellow new potatoes or yukon gold potatoes, peeled (about 1 lb. for 2 people)
Japanese mayonnaise, to taste
wasabi, to taste
Japanese Sanshou pepper, to taste (or regular black pepper)
thinly sliced English cucumbers (optional)

  • Place the peeled potatoes in a pot and cover with cold water. Bring to a boil, then simmer, uncovered, until potatoes are tender. Drain and allow potatoes to cool.
  • Finely chop potatoes and transfer to a bowl. Add a couple good squeezes of Japanese mayonnaise, a squeeze of wasabi, and season with Japanese pepper. Mix well. Taste and add more mayo, wasabi and/or pepper if needed. Add the sliced cucumbers right before serving and gently mix to combine.

Feta Baked in Olive Oil with Marinara, Red Onions & Oregano and a Simple Chickpea Salad


It’s the end of a long day, and you want a simple meal that brings you back to a happy time and place; Something like softened feta cheese bathing in bubbling-hot olive oil, accompanied by crusty bread. When we first made this baked feta, we were re-creating an appetizer that we enjoyed in a dimly-lit taverna on the first night of our honeymoon in Santorini. You place a block of feta in a baking dish, pour olive oil over it, scatter some chopped onions, peppers, and tomatoes (when in season), season with salt, pepper, and oregano, and let it bake until the oil is bubbling and the cheese is softened. So simple. Then you spoon the hot cheese, olive oil, and vegetables over your slices of bread and try not to burn your mouth as all those simple ingredients come together in one delicious bite after another.


On this night we had some jarred marinara sauce to use up, so we decided to spoon it around the feta before baking. It ended up being a great addition, and a good substitution for the fresh tomatoes we used in the original version. We also added some fresh chopped oregano and red pepper flakes on the top, which added beautiful color and bright flavor.


I wanted something cool to accompany this hot appetizer and turn it into a more substantial meal, so I tossed together some canned chickpeas, baby spinach, sliced red onion, grated carrot, fresh oregano, and crumbled feta (to echo the flavors in the main dish), and then dressed it with a simple lemon vinaigrette. The baked feta and the salad were a great combination and a comforting dinner. Bring a little piece of the Greek Islands into your home with this dish and allow it to comfort you. What comforts you at the end of a long day?


Feta Baked in Olive Oil with Marinara, Red Onions & Oregano

(Serves 2)

1 block of feta
extra virgin olive oil
jarred marinara sauce
red onion, diced
fresh oregano, chopped
salt & freshly ground black pepper
red pepper flakes

  • Preheat oven to 375 degrees. Place the feta in a shallow baking dish. Pour olive oil on and around the feta so that it almost covers the feta, but leaves the top of it exposed. Add spoonfuls of marinara sauce around the feta, on top of the oil. Scatter the onion and fresh oregano on top. Season with a little salt, pepper, and red pepper flakes. Bake until the oil is bubbling and cheese is softened, about 20 minutes. Serve with sliced crusty bread.


Simple Chickpea Salad

1 can of chickpeas, drained and rinsed
1/2 a red onion, thinly sliced
a couple handfuls of baby spinach
a couple handfuls of grated carrot
some crumbled feta
chopped fresh oregano
juice of 1 small lemon
olive oil
agave nectar
salt & freshly ground black pepper

  • Combine the first 5 ingredients in a large bowl. Add the lemon juice, a few good drizzles of olive oil, a drizzle of agave nectar (or honey) for sweetness, and salt & pepper to taste. Toss everything together. Taste, and adjust seasonings if necessary. Let sit for at least 10 minutes before serving. Better yet, make the salad as the feta is baking so the flavors can really meld.

Lamb & Sweet Onion Pitas with Orange-Cucumber Salad

It’s no surprise that we’ve been busy lately! Levi’s been crawling for about a month now, so dinners have had to be quick and easy to throw together while he zooms around the kitchen. These pitas are great for a weeknight because they are as quick to prepare as tacos but more exotic-tasting. Cinnamon-spiced ground lamb is topped with sweet caramelized onions, a refreshingly bright orange and cucumber salad with mint, and a dollop of cool Greek yogurt. A warm, chewy pita holds everything together for ease of eating! (And keeps one hand free for feeding bites to a baby).


Levi is quite the eater! We’ve moved away from purees at dinnertime (he was getting bored with them and much more interested in what was on our plates – do you blame him?) and now he pretty much eats whatever we eat for dinner. He loved each little bite that I made for him of pita, ground lamb, and a little greek yogurt (which somehow ended up on his forehead :))


Lamb & Sweet Onion Pitas with Orange-Cucumber Salad

(From the Feb/Mar 2011 issue of Fine Cooking)

2-1/2 Tbs. extra-virgin olive oil
1 medium sweet onion, halved lengthwise and sliced 1/4 inch thick
Kosher salt and freshly ground black pepper
1 lb. ground lamb
1/2 tsp. ground cinnamon
2 large oranges
1 small English cucumber, halved lengthwise and thinly sliced
2 Tbs. red wine vinegar
1 Tbs. coarsely chopped fresh mint
2 pitas, halved and very lightly toasted
1/3 cup plain Greek yogurt

  • Heat 1-1/2 TBS. of the oil in a 12-inch skillet over medium heat. Add about three-quarters of the onion, 1/2 tsp. salt, and 1/8 tsp. pepper and cook, stirring occasionally, until golden-brown, 8 to 10 minutes. With a slotted spoon, transfer the onion to a small bowl; set aside.
  • Cook the lamb, cinnamon, 3/4 tsp. salt, and 1/4 tsp. pepper in the skillet over medium-high heat, stirring occasionally and breaking up the meat, until cooked through, 5 to 7 minutes; drain well.
  • Meanwhile, finely chop the remaining raw onion and transfer to a large bowl. Cut the peels and pith from the oranges. Working over a bowl to collect the juice, cut the orange segments free from the membranes. Cut the segments into chunks. Add the oranges, orange juice, cucumber, vinegar, mint, and the remaining 1 Tbs. oil to the chopped raw onion; toss to combine. Season to taste with salt and pepper.
  • Fill the pitas with the lamb and cooked onions. Add some of the orange-cucumber salad and a dollop of yogurt. Serve the remaining salad on the side.

Tabbouleh Salad with Lemon, Mint & Chickpeas


“Hot Hot Hot! The Elephants are hot!” — the opening of one of Levi’s (Mommy’s) favorite books. These words popped into my head this morning, not just because I have the entire book memorized and often get it stuck in my head, but because the news informed me that there is a heat advisory in effect today from noon until 8pm. It’s not uncommon for Santa Cruz to see several chilly weeks in August and then experience a heatwave just as kids are starting school again.

There aren’t any elephants around here, but Mommy is hot; Levi is hot; the kitties are hot! That’s why last night we wanted a no-cook dinner and something Tabbouleh-ish was our inspiration. We’ve never cooked with bulgur before. It’s a delicious, quick-cooking grain with a nutty flavor. Adding fresh herbs, fresh seasonable vegetables, and some chickpeas for extra protein made it the perfect meal for a hot evening. The recipe below made enough for the two of us, with enough leftovers for 1 lucky person’s lunch.

Tabbouleh Salad with Lemon, Mint & Chickpeas

(Adapted from the recipe from Bon Appetit, as seen on Epicurious)

1/4 cup olive oil
1/4 cup fresh lemon juice
2 large garlic cloves, minced
1 cup bulgur (cracked wheat)
1 1/2 cups boiling water
a couple handfuls of cherry tomatoes, halved
1 cucumber, seeded and sliced
1/2 cup chopped fresh Italian parsley
2 large green onions, chopped
2 TBS. chopped fresh mint
1 can of chickpeas, drained and rinsed

  • In a small bowl, whisk together the olive oil, lemon juice, and garlic. Set aside.
  • In a large bowl, combine the bulgur with the boiling water. Cover and let stand until bulgur is tender and water has been absorbed, about 20 minutes.  (Alternatively you can add the bulgur to 2 cups of cold water, bring to a boil, and simmer, covered, for 12-15 minutes. Drain and transfer to a bowl).
  • Add the tomatoes, cucumber, parsley, green onions, mint, and chickpeas to the bowl of bulgur.  Add the olive oil/lemon juice mixture and gently mix with a wooden spoon.  Taste and season with salt & pepper to your liking.
  • Let sit for at least 30 minutes so that the flavors can blend. Serve with a simple green salad.

Levi is 4 months old!

[1st post-baby dinner!] Grilled Red Trout Fillets, Artichokes, and Salad with Grilled Lime Slices


Hello oishiifood followers.  This is a guest post by Dustin.  As you all know, Brianna does most of the writing for this wonderful collection of recipes we’ve come up with/tried.  I’m usually the “behind the scenes” guy doing my part in the kitchen and behind the camera.  So it’s a treat for me to share this recipe with all of you!


We made this dinner while my dad was up visiting his new grandson.  It was actually the first dinner we made since bringing Levi home so I wanted to do something easy but also extremely delicious! My dad and I left Brianna home with Levi and went to our local market (Shopper’s Corner).  I saw these beautiful red trout fillets and asked the butcher for two pounds (there were only 3 of us but I figured my dad and I can pack down the food).  When we got it home and I unwrapped it.  I couldn’t believe how much two pounds of fish really is!  Needless to say, I have a habit of getting way too much protein when left to my own devices and two pounds was about a half-pound too much for the three of us.  We also got some organic artichokes, zucchini, and a spring salad mix.  Now that I had all this fish, I had to figure out what to do with it.  I knew I wanted to grill the artichokes and the zucchini so I figured why not grill the trout too!

*One thing to note about my cooking style is that it’s very organic and not very precise.  I just kinda go with it.  So you’ll have to forgive the imprecise measurements and trust your instincts if you try this recipe!

Trout

1/2 pound of red trout fillets per person
a few cloves of garlic, minced
a good dose of olive oil
a healthy pour of paprika
salt and pepper
juice of one medium meyer lemon (ours was home grown!)
zest of 1/2 of one meyer lemon
long metal spatula

  • Set the trout out on a baking sheet.  Allow to come to room temp.
  • Meanwhile, in a small bowl combine all the other ingredients.  It should have a nice syrup like texture.  If it’s too watery throw in some more paprika and olive oil!
  • Once the marinade is ready, get down and dirty with those trout fillets.  Rub that stuff on there like there’s no tomorrow.  Each piece should be coated evenly.  Allow to sit (on the counter or in the fridge) for at least 15 minutes.  The lemon juice may turn the top of the fillets a grayish color, don’t worry, that’s perfectly normal.
  • Once the grill is heated up and ready to go, throw on the fillets.  Cover the BBQ and let those guys cook for a little while (depending on thickness around 4-7 minutes).  Here comes the tricky part, flipping the fillets.  Time to get out (or go buy) a long metal spatula.  Trout isn’t the heartiest fish, in fact it’s pretty delicate.  The flipping part of this is kinda like punching through a board (you know like karate kid), once you commit you have to go all the way.  Cook on this side for another 2-4 minutes.
  • That’s it!  You should now have some incredibly scrumptious fish ready to serve.

Artichokes

This is the first time that I actually cooked my own artichokes believe it or not.  I mostly just made it up  as I went after reading conflicting things online about the best way to grill them.  It worked out pretty dang nicely if I may say so.

at least 1/2 an artichoke per person
1 small lime or lemon
olive oil
salt and pepper

  • Get a large pot, fill it with water, and get it boiling.
  • Meanwhile, cut off the top 1/2″ – 1″ of the artichokes depending on size.  Two things to note here: 1) Use the sharpest knife you have, these things are tough!  2) You should see a tiny bit of purple in the center of the now cut off top, though different varieties may look slightly different).
  • Use that lime or lemon and juice up the “injured” leaves.  Place the artichokes in a large bowl of cool water, squeeze the rest of the lemon or lime juice in there, and let them sit for about 10 minutes or so.
  • After their soaking time is up, hold them upside down in the cool water bath and plunge each one up and down in the water while rotating from side-to-side for a bit (it’s gets out all kinds of dirt and bugs and stuff) and then toss them in to the boiling water.
  • Cook for about 15 minutes or until the base of the large leaves feel somewhat tender and the whole thing is noticeably more flexible.
  • Allow to cool.  Then cut in half on the vertical axis (through the stem, top to bottom).
  • With a spoon, scoop out all that hairy looking stuff.  Don’t go too deep into the base though, that’s the “heart” and it’s delicious!  Get rid of the smallest rows of leaves as well, the ones with really spiky feeling tips that come out with virtually no resistance.  Put the artichokes on a platter and drizzle with a little olive oil, add some salt and pepper, and they’re ready to grill!
  • Grill “open” side down for about 5-7 minutes or until you see some nice grill marks and they just look so mouth watering you can’t bear to leave them on the grill a moment longer.
  • Serve with mayonnaise for dipping.

Salad with Grilled Lime Slices

Lettuce of your choices (we used a spring mix, red leaf would be great too) for however many people
Greek style yogurt
juice from 1 medium lime
Agave nectar
1 medium lime thinly sliced
1 red bell pepper
salt and pepper

  • Grill the lime slices until they start to caramelize a bit and you see some nice grill marks.*
  • For the dressing, combine a good dollop or two of the yogurt, the lime juice, a healthy drizzle of agave nectar, and salt and pepper in a bowl.
  • Toss the lettuce, sliced bell pepper and the dressing in a large salad bowl.  Dish.  Then throw a couple of the lime slices on there to make it look pretty (and taste amazing too)!

*the grilled lime slices are equally good with the trout fillets!

Black-Eyed Pea & Ham Salad


These days feel so strange. The weather is warming up.  It’s spring break so the Boardwalk is open and we can hear roller coaster screams wafting up the hill into our backyard. Our little cherry tree is blossoming and has many tender green leaves, and the weeds in the front yard are out of control. All these things feel so familiar, but this isn’t going to be a typical spring season! Every time I post a recipe, I wonder if this will be the last time I post before the baby comes. Probably not, but we’ll see! If he/she takes after Dustin and I, it will be very prompt. Let’s hope that’s the case! 😉

This is a colorful and healthy salad that’s packed with fiber and protein and uses up leftover Easter ham — score! I turned to an old friend for this recipe, Gourmet Magazine (*insert collective “awww” here*). We used dried black eyed peas instead of canned, so I’ve included the directions for how to prepare those. Use canned if you’re in a hurry. Since this salad sits at room temperature for an hour before serving, it’s perfect for bringing to a potluck, picnic, or spring gathering. Enjoy! This recipe serves 4.

Black-Eyed Pea & Ham Salad

(From the April 2009 issue of Gourmet)

1 cup dried black eyed peas
1 cup chopped, cooked ham
1 rib of celery, chopped
1/2 cup chopped red onion
1 small garlic clove, chopped
1 teaspoon finely chopped fresh jalapeño (we used a fresh serrano pepper for more heat!)
2 1/2 tablespoons red-wine vinegar
2 tablespoons vegetable oil
1/4 cup chopped flat-leaf parsley

  • Rinse and sort peas. Put 1 cup peas and 4 cups of water in a pot. Bring to a boil. Lower heat and simmer until peas are tender, about 30 minutes. Drain and let cool.
  • Meanwhile, combine the rest of the ingredients in a large bowl. Add the peas and gently stir together. Season with salt & pepper (I also ended up adding a bit more vinegar than the recipe calls for).
  • Let stand at room temperature for 1 hour before serving,

Sausage & Mushroom Penne Gratin


Last Monday was a drizzly day. The overcast sky and the crisp air meant a dinner that was warm, comforting, and (given my current cravings) cheesy. I had just gotten home from lunch with Nikita when we decided to flip through old Gourmet magazines for dinner inspiration (oh Gourmet, how we will miss you when you are gone!!! :() Nikita came across this recipe. It fit my criteria so off to the store I went to grab Italian sausage, mushrooms, cream, and fresh mozzarella. Dustin liked it and said it reminded him of stroganoff, one of his favorite meals. I loved how it tastes like it’s been baking for an hour, when really most of it is done on the stove top and it’s finished off under the broiler – all under 30 minutes. We ate our penne gratin with a salad of baby spinach, apples, and hazelnuts (a lovely fall combo I first had at my parents’ house the night before, but I loved it so much I recreated it). The recipe below serves 4-6. We halved it and still had enough leftovers for Dustin to take it for lunch two days in a row (lucky him). Try this recipe sometime this fall when you’re in need of something comforting and cheesy. And enjoy it with a glass of red wine for me, will you? 🙂


Sausage & Mushroom Penne Gratin

(From the November 2008 issue of Gourmet)

1 pound dried penne
1 pound bulk sweet Italian sausage
2 tablespoons olive oil, divided
1 pound sliced mushrooms
1 garlic clove, minced
1 cup heavy cream
1/2 cup grated Parmigiano-Reggiano
8 ounces shredded whole-milk mozzarella, divided

  • Cook penne in boiling salted water until al dente. Reserve 1/2 cup pasta-cooking water, then drain pasta and transfer to a flameproof 3-quart baking dish.
  • Preheat broiler.
  • Meanwhile, cook sausage in 1 tablespoon oil in a 12-inch nonstick skillet over high heat, stirring occasionally and breaking up any large pieces, until no longer pink. Transfer with a slotted spoon to a bowl, leaving fat in skillet.
  • Add remaining tablespoon oil to skillet along with mushrooms and garlic, then cook over high heat, stirring occasionally, until mushrooms are golden, about 3 minutes.
  • Return sausage to skillet along with cream, reserved 1/2 cup cooking water, a rounded 1/4 teaspoon salt, and 1/4 teaspoon pepper and boil over high heat, stirring once or twice, until thickened, about 4 minutes.
  • Pour over pasta, then stir in Parmigiano-Reggiano, 1/2 cup mozzarella, and salt to taste. Spread evenly in baking dish and top with remaining mozzarella.
  • Broil 3 to 4 inches from heat until golden brown in spots, about 5 minutes. Keep an eye on it so you don’t burn your cheese!
  • Serve with my new favorite salad: combine baby spinach leaves (or mixed greens) with a sliced apple, and a couple handfuls of roasted hazelnuts. Toss with a dressing of red wine vinegar, olive oil, salt & pepper. I also added a little agave syrup for sweetness.

Pan-Fried Red Trout Fillets with Mizuna-Mango-Manchego Salad & a Simple Mango Cocktail


After weeks of writing about Swedish food and travel adventures, it feels both strange and comforting to once again be blogging from our own kitchen! This is a meal that we made a few days after returning home, but it had to wait in line until now! My cousin Nikita came over to cook dinner with us and this is the menu we came up with together.

Red Trout is a delicious, mild fish that goes well with whatever seasoning you choose. We decided to pan fry the fillets in a skillet, marinated in a garlicky-lime concoction that Dustin threw together in the food processor. The salad was Nikita’s creation – I love fresh mizuna because of its mildly spicy flavor. The cubes of manchego cheese add great texture and earthy flavor to the salad. The mango provides the sweetness to offset the slightly spicy-citrusy dressing. We served the fish and the salad with simple steamed white rice. And don’t forget the cocktails – the combination of mango, lemonade, and ginger beer is really refreshing. Serve over ice and sip in the backyard before dinner!

Pan-Fried Red Trout Fillets with Citrus & Garlic

1/2 a white onion
4 cloves of garlic
zest of 2 small limes*
juice from 1 lemon
olive oil
salt & pepper
1 trout fillet per person

*We used lime zest because we needed the juice for our salad dressing. You could use the zest of the lemon in its place.

  • Combine the onion, garlic, lime zest, and lemon juice in a food processor, and process for about 5 seconds. While machine is running, add some olive oil until it becomes the consistency of a paste. Season with salt and pepper.
  • Spread the mixture over the trout fillets and place in a Ziplock bag to marinate for a bit.
  • When ready to cook, heat a pan or skillet over high heat. Add a little olive oil to coat the bottom. Remove fillets from bag and place in the pan skin side down.  Cook for about 3 minutes. Flip and cook the other side for another 2-3 minutes. Transfer to plates and serve with steamed rice and the delicious salad below.

    Mizuna-Mango-Manchego Salad with Lime Vinaigrette

    a few big handfuls of mizuna, washed and dried
    1 mango, cubed
    about 4 ounces of manchego cheese, cubed
    olive oil
    juice of 2 small limes
    cayanne pepper to taste
    paprika to taste
    salt & pepper to taste

    • Place the mizuna in a salad bowl. Add the cubes of mango and the manchego.
    • In a small jar or container with a tight-fitting lid, combine some olive oil, the lime juice, cayenne, paprika, and salt & pepper. Shake vigorously. Taste and adjust seasonings (and amount of oil, if needed).
    • Pour over salad and toss gently.

      Mango-Lemon-Ginger Cocktails:

      Mango Vodka (we used Absolut – it’s from Sweden! :))
      Lemonade
      Ginger Beer
      Ice

      • Fill a highball glass with ice. Add a shot of mango vodka. Top with lemonade and then ginger beer. Stir and serve. See? That was simple!

      Grilled Lamb Gyros with Tzatziki & Summer Chickpea Salad


      We’ve been thinking about gyros ever since we went to a Greek Food Festival with our friends last month. I think my favorite part of a gyro is the tzatziki. The cucumber, lemon and yogurt make for a refreshing sauce that goes perfectly with grilled meat, tomatoes and onions. Last night we made our own version of a gyro by wrapping pita bread around grilled lamb that was marinated in olive oil, herbs, and garlic, some homemade tzatziki, and a summery salad of chickpeas, cherry tomatoes, red onion, feta cheese and herbs that I found in one of my favorite Jamie Oliver cookbooks. Some grilled summer squash rounded out what we deemed the perfect summer BBQ meal.

      Last night was a wonderful night to eat outside. Not only are we approaching the longest day of the year so it stays light long enough to finish both dinner and dessert (and a bottle of wine or two), but it’s been staying warm until the sun goes down. Also, we planted a little vegetable garden today and wanted to be near it! Some sugar snap peas will soon be growing up bamboo sticks. Grow, peas, grow!


      We also planted two varieties of tomatoes (Early Girl and another that I’ll have to get back to you on, but it’s an heirloom variety), an artichoke, a zucchini, and basil! Look how cute this little sugar snap pea plant is! I haven’t gotten around to photographing the other plants yet, sorry!


      Unrelated to vegetables, the hydrangeas are gorgeous right now! Don’t they make you want to be outside? My cats love to jump around and try to catch the bees that hover over their flowers. Sometimes they do little back-flips in the process and it’s very entertaining to watch. Cats really do always land on their feet! Ok, now let’s get to some recipes …


      Summer Chickpea Salad
      (Slightly adapted from Jamie Oliver)


      1 small red onion, thinly sliced
      1 clove of garlic, minced

      2 fresh red chilies, de-seeded and sliced

      2 handfuls of yellow pear tomatoes (or cherry tomatoes), halved

      2 limes

      extra virgin olive oil

      salt & freshly ground black pepper

      cumin
      chili flakes

      1 14 oz. jar of chickpeas, drained

      a handful of fresh mint, chopped

      a handful of fresh basil, finely ripped

      7 oz. feta cheese

      • In a bowl, combine the sliced onion, garlic, chilies, and tomatoes. Dress with the juice of 1 1/2 limes and about 3 times as much olive oil. Season to taste with salt, pepper, cumin, and chili flakes (or whatever combination of spices you desire).
      • Heat the chickpeas in a pan. Add 90% of them to the bowl. Mush up the remaining 10% and add these to the bowl as well (Jamie says they give a nice, creamy consistency. They sure did).
      • Allow salad to marinate for a little while and serve at room temperature. Just before serving, add the fresh mint & basil. Taste one more time and adjust the seasoning. You can also add the juice from the remaining lime half if you think it needs it. Crumble the feta cheese over the salad and gently mix. Serves 4.

      Tzatziki


      1 english cucumber
      1 cup yogurt

      2 garlic cloves, minced
      juice from 1/2 a lemon
      1/4 of a small red onion, minced (optional – we had some leftover from the salad)
      a handful of fresh oregano, chopped

      salt and freshly ground black pepper

      • Cut the cucumber in half lengthwise and scrape out the seeds with a spoon. Grate the cucumber onto a kitchen towel or heavy duty paper towel. Pick up the towel and squeeze the excess moisture out of the cucumber. Do this several times until no more water is coming out of the towel.
      • In a small bowl, combine the grated cucumber, yogurt, lemon juice, red onion, minced garlic, oregano, and salt & pepper. Mix well. Cover and let chill in the refrigerator for a little while so the flavors can mingle. Taste again before serving and adjust seasoning if necessary.

      Grilled Boneless Leg of Lamb Gyros
      (We explained to our butcher that we wanted to grill lamb to slice to make gyros. He was very helpful and offered to sell us the boneless legs that they usually use to make the marinated lamb cubes. The moral of the story is – don’t be afraid to ask your butcher if you don’t know exactly what kind of cut of meat to get! They are there to help you out!)


      2 lbs boneless leg of lamb
      paprika
      cumin

      salt & freshly ground black pepper
      extra virgin olive oil
      several cloves of garlic, minced
      fresh rosemary, chopped
      fresh oregano, chopped
      about 1 TBS red wine vinegar

      • Make a dry rub out of enough paprika, cumin, salt and pepper to cover every surface of your lamb. Place in a baking dish or pie pan.
      • In a small bowl, combine enough oil, minced garlic, chopped herbs, and vinegar to create a pesto-like consistency. Rub this mixture all over the lamb. Allow to marinate for at least an hour. Two is even better. Prepare a charcoal grill (we used mesquite charcoal for a delicious, smoky taste). Let lamb come to room temp before grilling.
      • Remove the lamb from the marinade and place on the grill. Cook, turning occasionally until the meat reaches an internal temperature of about 145 degrees for medium-rare. Let rest 10-12 minutes before thinly slicing.
      • Assemble the gyros by heating up some whole wheat (and/or regular) pitas on the grill. Top with a few slices of lamb, a spoonful of chickpea salad, and some tzatziki. Alternatively, you can enjoy “de-constructed gyros” by placing all these components on your plate and enjoying in whatever order/combination you like!

      Shredded Chicken Taco Salad with Sour Cream-Lime Dressing


      It’s HOT. The cats are sprawled out underneath the ceiling fan (I may just join them), and I’m thinking about how growing up on the California central coast has really spoiled me when it comes to weather! But thanks to some leftover BBQ chicken breasts from the night before, we didn’t have to cook anything on the hottest day in Santa Cruz since 1899! We heaped chopped lettuce onto two plates, scattered some grated pepper-jack cheese over it, added the chicken that we shredded, and some sliced avocado and tortilla chips. Dustin made a cool sour cream-lime dressing that tied everything together! A bottle of crisp & minerally Big House White finished off the meal. Keep this one in mind when ridiculous weather is happening in your town!

      For the Dressing:

      4 ounces sour cream (from an 8 oz. container)
      2 small limes
      cumin
      chili powder
      salt & pepper

      For the Salad:

      red leaf lettuce, chopped
      a few handfuls of grated pepper-jack cheese
      a few handfuls of cilantro
      2 chicken breast halves, (preferably grilled) cooled and shredded
      1 avocado, sliced
      a few handfuls of tortilla chips
      salsa

      • In a small bowl, combine the sour cream, juice of 2 limes, and seasonings. Taste and add more of something if you think it needs it. Set aside.
      • Wash and dry the lettuce, then roughly chop it. Divide between two plates.
      • Scatter the grated cheese on top of the lettuce, followed by the cilantro and shredded chicken.
      • Place half a sliced avocado on the side of each plate. Scatter some tortilla chips (lightly crushed, if you prefer) around the plate.
      • Spoon the dressing on top of each salad. Finish with a dollop of your favorite salsa.

      Happy Easter! Part 2: Lemony Couscous with Peas, Mint, and Pea Shoots


      This may have been another Easter side dish, but my fork kept gravitating to it on my plate, as if it were the main dish. We dressed couscous up for spring with peas, cumin seeds (ground in a mortar and pestle), fresh mint from the garden, refreshing pea shoots (I love how much delicate pea flavor is concentrated in the shoot), and a scattering of crunchy almonds. It would be delicious on its own for lunch, with kabobs, salmon, or ham for dinner … ok, pretty much anything! The measurements aren’t specific because depending on how much couscous you make, you add the other ingredients in proportion to that, using your own judgment.

      Lemony Couscous with Peas, Mint, and Pea Shoots:

      1 package of couscous
      olive oil
      green onion
      snow peas
      ground cumin seed
      fresh mint, chopped
      1-2 lemons
      fresh or frozen peas
      salt & pepper
      a splash of tangerine (or orange) juice
      pea shoots
      almonds, roughly chopped

      • Cook the couscous according to package directions, adding some olive oil or butter along with the hot water. When it’s ready, fluff with a fork and set aside.
      • In a large serving bowl, toss in some sliced green onion, snow peas that have been cut in half, some ground cumin seed, chopped fresh mint, and the juice of a lemon.
      • Add the couscous (it’s ok if it’s still warm) to the bowl, and a few handfuls of peas. Gently combine. Taste and add more lemon juice. Season with salt & pepper. (Can be refrigeratred overnight at this point, covered).
      • Just before serving, add a splash of tangerine juice to the couscous salad and gently stir. Arrange the pea shoots around the bowl. Sprinkle some chopped almonds on top.

      Couscous making its debut next to the Easter ham.

      Happy Easter! Part 1: Farro Salad with Marinated Baby Artichokes


      May the freshness of spring remind you of new hope, new life, and new beginnings. This Easter felt extra special because it was the first one in 3 years where we were surrounded by family and friends back in our own country. We enjoyed a feast full of fresh spring produce, ham that came from a happy (and local) TLC Ranch pig, a few ping-pong games, and of course an egg hunt or two! I’ll be posting some recipes in a few separate posts, but in this one I’ll paint the general picture and share the first of two springy salads.

      Farro Salad with Marinated Baby Artichokes:


      Farro is my new favorite grain. I’m glad that I recently became aware of its existence. It takes longer to cook than other grains, but its sweet, nutty flavor and slightly chewy texture in the end is worth the wait, especially in this simple salad with baby artichokes, bell pepper, rosemary and lemon. When my mom and I went shopping for Easter dinner ingredients, we were immediately attracted to some cute little artichokes. When we got home, we boiled them, pulled off the leaves until the tender ones were exposed, trimmed the stems, cut them in half lengthwise and threw them into a bowl, where they mingled with the juice of a lemon, chopped fresh garlic, olive oil and parsley overnight … resulting in the perfect DIY marinated artichokes!

      We toasted the farro in some olive oil in the bottom of a heavy pot until it was fragrant and nicely coated with oil, about 3 minutes. Then we added water to the pot, brought it to a boil, and cooked the farro until tender (according to package directions, about 20 minutes). After draining the farro, it cooled on a cookie sheet for a little while. Meanwhile, we cut bell peppers into strips, chopped some green onions, and some fresh rosemary. When the farro was cool enough to touch, we poured it into a large bowl, added the marinated baby artichokes from the day before, the bell pepper, green onion, rosemary, more lemon juice to taste, and seasoned with salt.


      Colorful flower pots containing spring seeds, chocolate, and other springy surprises awaited each “kid” (though most of us have grown up):


      Easter is that special day on which you can keep a bowl of pastel-colored candy on the counter and eat it all day.

      My brother unveiled the 3rd batch of his beer – this time an Irish Porter. We enjoyed its refreshing, complex flavor while devouring a cheese plate. Then we piled as much of this menu as we could onto our plates and ate outdoors on the deck, taking in one of the first warm days of spring:

      *recipe coming soon … these are the things that I helped make this year.

      Thyme Honey Glazed Ham
      Grilled Salmon
      Grilled Asparagus with my brother’s homemade Green Garlic Aioli
      Farro Salad with Baby Artichokes
      Couscous with Peas, Lemon, Mint & Pea Shoots*
      Roasted Beet Salad with Pine Nuts & Goat Cheese
      Mixed Greens with Edible Flowers
      Francese Bread

      And of course something sweet:

      Pashka (a traditional Russian Easter dessert)*
      Chef Panisse Almond Cake
      Rhubarb Tarts with Orange Glaze*


      Faith takes a moment to rest. It takes a lot of energy to beg for Easter ham.

      Mustard-Green Onion Potato Salad


      Spring makes me think of eating outdoors and all the food that traditionally gets piled onto a paper plate at barbecues and picnics – potato salad is one of my favorites. This is a delicious mayo-based recipe, but the real focus is on my favorite condiment, the mustard – 3 kinds in fact. And you’ll always find chopped hard boiled eggs in my potato salad, just like my mom puts in hers. However, because this was Dustin’s request for his lunches this week, I had to leave out the chopped dill pickles, my other favorite addition. Add them if you’re a fan like I am!

      Mustard-Green Onion Potato Salad
      (Adapted from The Food Network.com)

      2 pounds red new potatoes, boiled and sliced into rounds
      2 hardboiled eggs, peeled and chopped
      3 green onions, white and green parts, sliced
      1 clove garlic, minced
      1 handful parsley, chopped
      3/4 cup mayonnaise
      3 TBS. Dijon mustard
      2 TBS. whole grain mustard
      1 TBS. honey mustard
      2 TBS. red wine vinegar
      a generous pinch (or more) of chili powder
      salt & pepper to taste

      • Throw the warm sliced potatoes, hard boiled eggs, green onions, garlic, and parsley in a large bowl.
        • In a smaller bowl, whisk together the mayonnaise, mustards, vinegar, and chili powder. Taste and season with salt & pepper.
        • Pour the dressing over the potatoes and carefully mix until combined. Serve immediately or refrigerate, covered with saran wrap, until serving.